Tuesday, May 17, 2016

New Site & New Tutorial

The past few months have been a whirlwind of crocheting and sewing, taking pictures and videos, learning new software and building a new website... I've learned so much, and I'm so excited to be able to share it with you! Everything is still a work in progress (like most things in my life  ¯\_(ツ)_/¯ ), but I have gotten to a point where I'm ready to share the new site and Part 1 of my High Tea Crochet Quilt Tutorial. 

You can visit my new online home at fannyludesigns.com

For the High Tea Crochet Quilt Tutorial you can go directly to http://fannyludesigns.com/high-tea-crochet-fusion-quilt-tutorial/


Tuesday, March 15, 2016

When Fabric Meets Crochet


Not too long ago, I was reading "Big Magic" by Elizabeth Gilbert and was struck by her writing on the nature of ideas. She believes that ideas are alive and they they can jump from soul to soul in order to find the most efficient route to earth. Since I haven't done much crafting since my son was born, and I haven't found much inspiration since my favorite fabrics stores closed last year, I've felt that many ideas have passed me by. But my luck changed when my friend, Jera Brandvig, announced her new fabric line. "High Tea" is a gorgeous collection of prints inspired by vintage china tea sets and dainty, lace doilies.


Just the images of this fabric inspired me to reach back into my earliest memories of crafting and drinking tea with my Grandma Ruby. I've written before about how Grandma Ruby gave me my first crash course in sewing, but she also taught me crochet and embroidery (and how to drink tea with tons of sugar--she was from the south). I remember making long crochet chains as a young girl sitting in her living room, and then making chains of my chains, until she showed me how to use a hook to make fabric of single and double crochets. Somewhere my mom has my first real crochet project: a wonky, green scarf that I made for her. These memories made me want to combine my love of crochet, with Jera's beautiful, vintage inspired fabrics.


Old crochet tablecloths and blankets are usually made of small "motifs" that are joined together. Crocheted granny squares are a basic example of this technique, but Jera's fabric demanded a more elegant touch. So I got out my collection of Grandma Ruby's vintage crochet magazines, looking for more inspiration. Eventually, I settled on trial and error and sketching out my own design.


I'm extremely happy with how this blanket turned out. I had only three weeks to finish it, so I didn't stop and take many picture along the way. I will work on getting a tutorial together soon though--just as soon as I catch up on sleep and chores. :-)


It's time for a nap!
Happy Stitching!
~Tiffany

Friday, August 28, 2015

Toddler/Travel Pillowcase Tutorial


A few weeks ago I finally finished the hand-sewn, hand-quilted hexagon blanket for my son that I started when I found I was pregnant. He's turning 1 in two weeks! It's amazing how times flies! Anyway, I had a bit of leftover fabric that I set aside to make a matching pillowcase.  I wanted an envelope style enclosure with a fun contrast band with a narrow accent, but I couldn't find a pattern or tutorial for exactly what I had in mind.  So I made my own.  Here's what I did:

Materials

1/2 yard Main Fabric
1/3 yard Contrast Band
1/4 yard Accent (optional)
13" by 18" Toddler/Travel Pillow (I used this one)

Cutting

Main fabric--
  Cut one piece 30" wide by 14" tall

Contrast band--
  Cut one piece 11" wide by 14" tall
  Cut one piece 5" wide by 14" tall

Accent--
  Cut two pieces 2" wide by 14" tall
  (Note: this makes a 1/2-inch wide accent strip, for a narrower strip cut the pieces 1.5" wide)


Assembly

Hem one of the 14" sides of each contrast band.  Fold over 1-inch and press.  Open up the and fold up to the crease, press again.


Refold along both creases.  Edgestitch close to the fold.  This makes a 1/2-inch narrow hem.


Fold the accent piece in half length-wise and press.  Open it up and with right sides together, align along the raw edge of the contrast band.  Pin in place and sew along the crease.


Trim the inside edge of the acccent to 1/2". (This will reduce bulk in the next seam.) Fold along crease again.


With sides together, pin the main fabric to contrast band.  Sew a 1/2" seam.


Press the seam toward the main fabric. (It helps to press the seam open first and then to the side.)


Finish the raw edge with an overcast stitch. (A zigzag stitch or pinking shears would work, too. And if you have a serger--by all means use it.)


Repeat with the other side.


With right sides together, fold the pillowcase in half width-wise, so that the contrast and accent bands are aligned.  Pin in place and baste with a long machine stitch about 1/4" inch from the edge.


Fold the extra contrast over so that it wraps around the opposite side. Pin in place and sew a 1/2" seam along each side.  Finish the raw edges with an overcast stitch (or your method of choice.)


Turn right side out and you're done!


The finished pillowcase should measure 13" x 18".


Tuesday, June 2, 2015

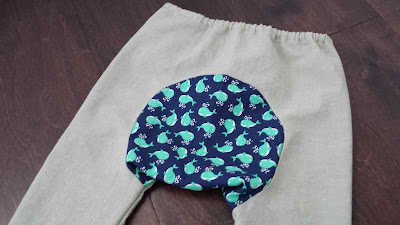
Baby Pants


Right now the baby is asleep, the house is clean, and I feel like I've been in possession of super powers for the past 2 days.  This afternoon two dear friends from my Stitch & Sew days came over for a visit. One of them is due to have her second boy in about a month, so I racked my brain over the weekend for what gift I could get for him. I wandered around the mall on Sunday, but nothing looked special enough. I finally decided that I'd have to make something.  I doubted I could get anything significant done by Tuesday afternoon. Still, I had to try.

Should I make a quilt or a blanket? A toy? Bibs? Burp cloths? ... I remembered I had a pattern for some adorable baby pants. I could make a whole set! So yesterday morning I dug out the pattern, copied it onto Swedish tracing pattern (the best stuff ever!) and after the Fredster's morning nap, we took a trip to the fabric store.  I washed and dried the fabric and managed to get it almost completely cut out by the end of his last nap.  After his bedtime, I went to work.  He fell asleep at 7pm and I was done by 10:30. Hurray!!


The pattern is from Purl Soho. It's so quick and easy! I used the overcast stitch on my machine to finish the seams, so they should hold up in the wash. The only difficult part was sewing the gusset, but with lots of pins, I didn't have any problems.


Thursday, May 28, 2015

Finished Hexagons #1


I've had my hands full the past few weeks trying to keep up with my crazy kid.  He's crawling all over the place and pulling up on everything.  So while this quilt has been finished for a while now, I'm only just now able to catch my breath and post about it.  Greg and Monica at West Seattle Fabrics did the machine quilting for me.  This is the first time I've ever had a quilt long-armed, and I'm very pleased with the result.  And they finished it in less than a week!


I'm also still stitching away on the other hexagon quilt.  The hand quilting is going much faster than I had anticipated.  So I'm confident that I'll get it finished by my goal of Freddy's birthday in September.